How to Install a Dimmer Switch
- Diane Serra Huelma
- Dec 4, 2025
- 5 min read

Are you tired of harsh overhead lighting in your home? It's time to upgrade to a dimmer switch. This simple addition can transform the ambiance of your space, allowing you to adjust the brightness to suit different activities and moods. Whether you want to set a romantic dinner tone or create a cozy reading nook, installing a dimmer switch is a straightforward DIY project that can save you money on energy costs while enhancing your home's comfort. In this guide, you'll learn everything from understanding dimmer switches to step-by-step installation and troubleshooting common issues.
Understanding Dimmer Switches
Dimmer switches are devices that allow you to control the brightness of your lights. Unlike traditional switches that can only turn lights on or off, dimmers enable you to adjust the wattage being used, which translates to varying levels of brightness.
There are several types of dimmer switches:
Slide dimmers: These have a slider that allows you to adjust the brightness easily.
Rotary dimmers: These are controlled by turning a knob.
Smart dimmers: These can be controlled via smartphones or voice commands, integrating seamlessly with smart home systems.
Understanding the type of dimmer you want to install will guide your preparation and installation process. Make sure to check your existing light fixture's compatibility and any specific requirements for smart dimmers.
Benefits of Using Dimmer Switches
Installing dimmer switches comes with a plethora of benefits:
Energy Efficiency: By reducing the amount of electricity your lights use when dimmed, you can save on energy bills.
Extended Bulb Lifespan: Dimming lights can extend the life of bulbs, which means less frequent replacements.
Mood Control: Dimmers allow you to create the perfect atmosphere, whether you're hosting a party or enjoying a quiet evening at home.
Enhanced Aesthetics: They can also enhance the overall look of a room, allowing for more intimate and inviting spaces.
Reduced Eye Strain: Dimming lights can help reduce glare and create a softer glow, decreasing eye strain during late hours.
Preparation Before Installation
Before you jump into the installation process, take some time to prepare. Here's what to do:
Gather your tools
You will need a flat-head screwdriver, a Phillips-head screwdriver, wire strippers, and, if necessary, a voltage tester.
Choose the right dimmer switch
Make sure the dimmer you purchase is compatible with the type of lights you are using (LED, incandescent, etc.). Check the wattage rating as well.
Turn off the power
This is crucial for safety. Go to your circuit breaker and turn off the power to the circuit where you'll be working.
Read the instructions
Familiarize yourself with the specific installation instructions that come with your chosen dimmer switch.
Step-by-Step Installation Guide
Now that you're prepared, it's time for the installation:
Remove the Old Switch
Unscrew the faceplate and the existing switch. Carefully pull it out from the wall.
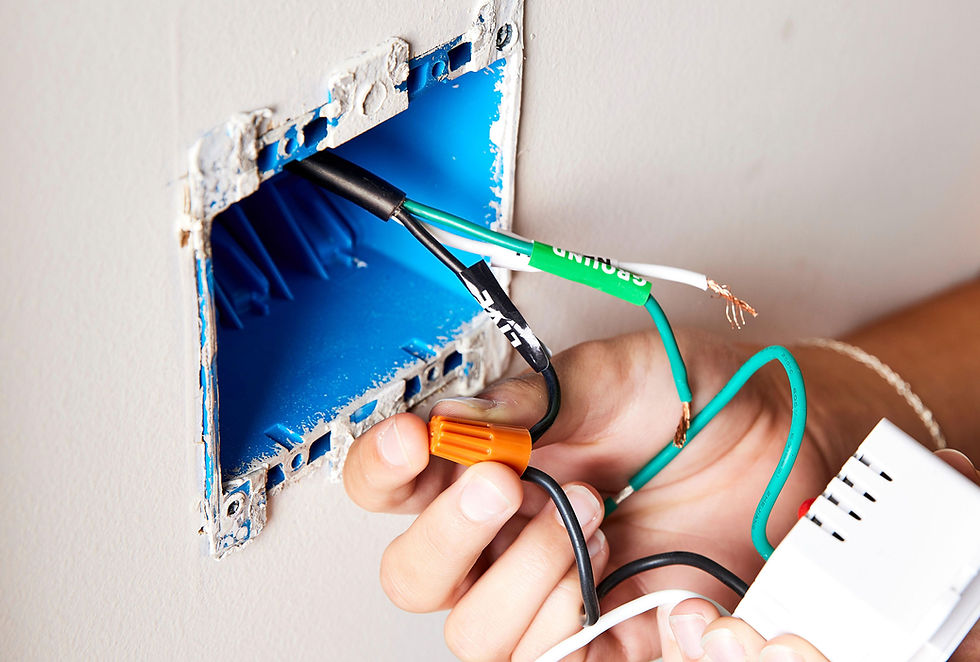
Identify the Wires
You should see three wires: a hot wire (usually black), a neutral wire (usually white), and a ground wire (green or bare).
Connect the Wires to the Dimmer Switch
Connect the hot wire to the dimmer's hot wire (usually marked). Connect the neutral wire to the dimmer's neutral wire (if applicable). Attach the ground wire to the dimmer's ground connection.
Secure Everything
Push the wires back into the electrical box and mount the dimmer switch into the wall.
Reattach the Faceplate
Once secured in place, screw the faceplate back on.
Restore Power
Go back to the circuit breaker and turn the power on.
Test the Dimmer
Adjust the switch to see if the lights dim and brighten as expected.
Common Issues and Troubleshooting
After installation, you may encounter some common issues. Here are a few and how to address them:
Lights flickering: This can happen if the dimmer is incompatible with the bulbs. Ensure your bulbs are dimmable.
Dimmer not working: Check if you've wired the switch correctly. Sometimes, a loose connection can cause problems.
Overheating: If the dimmer feels hot to the touch, it might be overloaded. Check the wattage of your bulbs versus the dimmer's capacity.
If you can't resolve the issue, consult with a licensed electrician for assistance.
Safety Tips for Working with Electrical Fixtures
Safety should always be your priority when working with electrical fixtures. Here are some tips to keep you safe while installing a dimmer switch:
Always turn off the power at the circuit breaker before starting any work.
Use a voltage tester to ensure the power is off before touching any wires.
Avoid working in wet conditions or while standing on wet surfaces.
Consider wearing gloves to protect your hands from accidental shocks.
Consult a professional if you're unsure about your ability to complete the installation safely.
For projects like installing dimmer switches or any other electrical work, it’s always best to rely on experienced professionals who can ensure safety and quality results. At The Handyman San Diego, we not only provide reliable electrical services but also offer a wide range of home improvement solutions, including doors and windows, garage repairs, and painting, to keep your home secure, functional, and looking its best.
Conclusion
Installing a dimmer switch is a fantastic way to enhance your living space while also increasing energy efficiency. By following this guide, you can successfully install a dimmer switch that will transform the way you experience light in your home. Beyond the improved ambiance, dimmers also help extend the life of your bulbs and give you greater control over your household’s energy use. While DIY projects can be rewarding, electrical work always carries risks, and having a professional ensures the job is done safely and correctly.
At The Handyman San Diego, our team is here to handle dimmer switch installations, outlet and switch replacements, and a full range of home improvement services—including doors and windows, garage repairs, and painting.
Contact us today to schedule your electrical service and enjoy peace of mind knowing your home is in expert hands.
Frequently Asked Questions
What is a dimmer switch and how does it work?
A dimmer switch allows you to control the brightness of your lights by adjusting the wattage. It provides more flexibility than traditional switches, enhancing mood and energy efficiency in your home.
How do I install a dimmer switch myself?
To install a dimmer switch, turn off the power, remove the old switch, connect the hot, neutral, and ground wires to the new dimmer, secure it, and restore power to test functionality.
What are the benefits of using dimmer switches?
Dimmer switches improve energy efficiency, extend bulb lifespan, enhance mood control, and reduce glare, making your living space more comfortable and inviting.
Can a dimmer switch work with LED bulbs?
Yes, but it's essential to use LED-compatible dimmers, as not all dimmers support LED technology. Check the dimmer's specifications to ensure compatibility.
What should I do if my dimmer switch is flickering?
Flickering lights can indicate incompatibility with the bulbs. Ensure that your bulbs are dimmable and compatible with the dimmer. If issues persist, check wiring connections.
Are smart dimmers worth the investment?
Smart dimmers offer convenience through app control and voice commands, allowing customizable lighting options and integration with smart home systems, making them a worthwhile investment for many.


Comments